
Did you know that you can create a report that shows you the form data that is being submitted in each form field for a specific form submission? Having this report will help to confirm that the data you see in the browser is matching the data that the form is submitting. Let’s get started!
Let’s first find a form submission that we want to view the details with.
- Go to any published form that has form results.
- Hover over the white space of the form row and click to open the side panel.
- Click on the ‘Reports’ tab
- Select the ‘Individual Form Results’ link.
- What you are looking for in the report is the ‘Request Form ID’ for the form submission that you wish to check the data on. This is usually towards the end of the row.
- Note down that Request Form ID for future reference.

We are now ready to build the report but we first need to create a custom view.
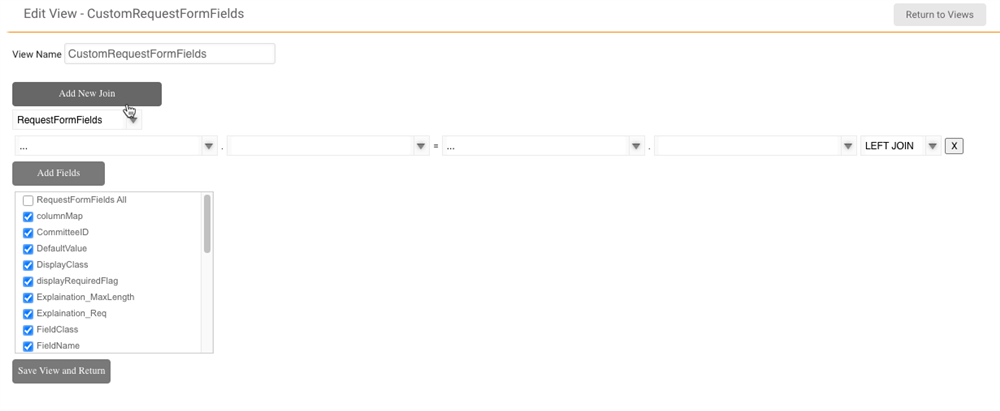
- Create a custom view by going to Menu > Analytics > Views.
- Click the New button in the upper right section.
- Create the view that looks like the below screenshot (Note: After you add the fields for the RequestFormFields table, all you need to do is check the top checkbox to select all fields.
- Save the view and Return.
Now that we have the view, we can create the report.
- Create a custom view by going to Menu > Analytics > Custom Reports
- Click Create and select ‘Advanced Report’
- Enter in the report details:
- Data Source: Custom Views
- Table View: Select the custom view you just created.
- Report Type: Tabular
- Report Name: Form Mapping Troubleshooting
- Report Description: Enter anything here.
- Choose to share the report or not.
- Select the folder.
- In the Report Columns tab, add the following fields:
- RequestFormFields.FieldName
- Set the display label to ‘FieldName’ for readability.
- RequestFormFields.columnMap
- Set the display label to ColumnMap for readability.
- RequestFormFields.FieldValue1
- Set the display label to FieldValue for readability.
- RequestFormFields.FieldName
- In the Filter tab, add a new condition.
- Select the RequestFormFields.RequestFormID field.
- Set the Operator to ‘Equals’
- Enter the Request Form ID that you collected previously.
- Save and run the report.
The report results should look something like the below screenshot (Note: The fields data will reflect the field name and column map that was configured in your form, so the names will be different from your report):
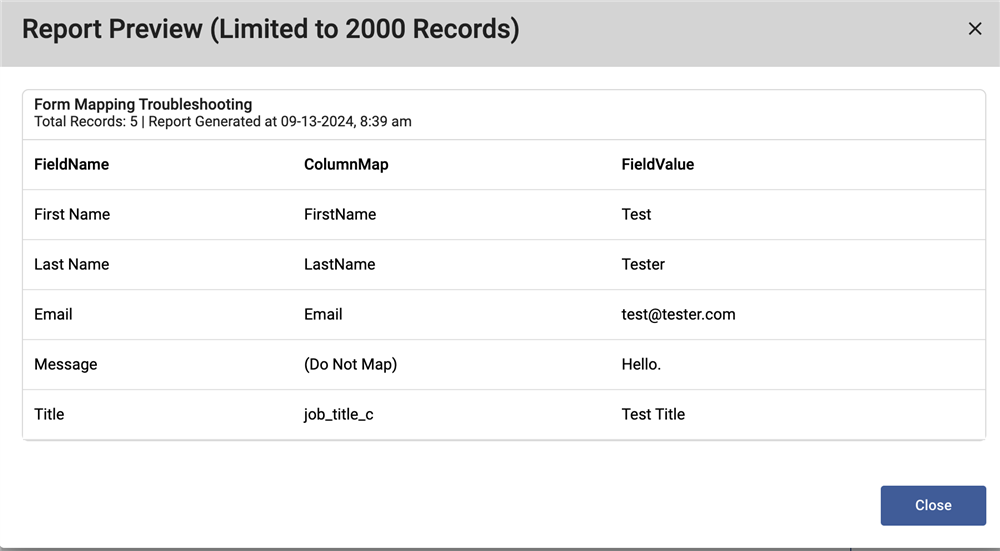
Understanding the report results.
- The FieldName column shows you the name of the form field that you used in the form settings.
- The ColumnMap column shows you which field the form is mapping the data to.
- The FieldValue column shows you the value that was entered in the form submission.
Based on the form results, we can see that the Title form field is mapping to the job_title_c field and if the form data is pushing to the CRM, then it will map to the CRM job_title_c field.
If you need the Title field to map to the CRM Title field, then you would need to edit the form and change the form mapping to map to the ‘Title’ field rather than the ‘job_title_c’ field.
Remember, after any form change, be sure to re-save and re-publish the form, then update the form code on the landing page and save and republish the page.