

Across the data-driven business landscape, organizations cannot miss the opportunity to extract actionable insights from their CRM systems. One of the popular data stack decisions on the market is the combination of Looker Studio (previously Google Data Studio) and SugarCRM data. This integration empowers users to transform raw data into impactful dashboards and reports.
In this guide, we show 3 ways how to achieve flexible and seamless integration of SugarCRM data into Looker Studio dashboards by applying the Skyvia platform as a third-party solution. Choose the most applicable method and unlock deeper insights to make data-driven decisions with confidence.
3 ways to integrate SugarCRM Data into Looker Studio
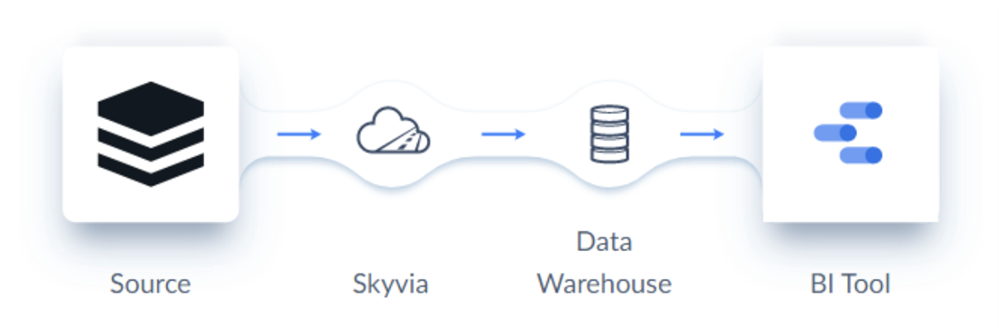
1. Upload SugarCRM data to the data warehouse of your choice
Companies utilize data warehouses as a go-between tool to gather data from multiple channels and disparate sources: CRM systems, social media platforms, legacy data, etc. Applying DWH as a single source of truth helps organizations to perform comprehensive analytics.
The short checklist on how to integrate SugarCRM with DWH
Step 1. Choose a data warehouse. Select a data warehouse that suits your business needs. Popular options include Google BigQuery, Amazon Redshift, and Snowflake.
Step 2. Extract, transform, and load SugarCRM data. Extract data using the most suitable method: ELT or ETL process. Ensure that you retrieve the necessary tables and fields required for your analysis. Transform the extracted SugarCRM data into a structured format compatible with your chosen data warehouse. This may involve cleansing, aggregating, and modeling the data to make it suitable for analytical purposes.
Step 3. Create a warehouse schema. Skyvia automatically designs and implements a schema within your data warehouse that reflects the structure and relationships of your SugarCRM data. This step is crucial for efficient querying and visualization in Looker Studio.
Step 4. Establish a connection with Looker Studio. Configure the connection between your data warehouse and Looker Studio. This involves providing the necessary credentials, defining the data source, and configuring access permissions.
Step 5. Define data models. Utilize LookML (Looker Modeling Language) to define data models within Looker Studio. This allows you to establish relationships, create measures, and define dimensions based on the structure of your SugarCRM data in the warehouse.
Step 6. Design dashboards and visualizations. Leverage Looker Studio's intuitive interface to design engaging dashboards and visualizations. Utilize the rich set of features and tools available to create insightful reports and explore your SugarCRM data from various angles.
Since Skyvia offers a Free plan to start with, it’s quite easy to try this and other variants and find the one that suits your case. All you need to do is sign in with Skyvia’s free plan and log in to the Skyvia platform that directly connects SugarCRM data within Looker Studio, allowing users to query and retrieve data.
2. Connect SugarCRM to Looker Studio through OData
Another way to establish a connection is by using OData. It serves as a standardized protocol for data transfer, enabling seamless integration between different systems. With OData, there are no complexities associated with custom API integrations; thus, businesses can focus on improving data strategies and performance.
The short checklist on how to integrate SugarCRM within OData
Step 1. Enable OData in SugarCRM. Configure and enable the OData API in your SugarCRM instance. This may involve adjusting settings, permissions, and access controls to ensure proper data exposure.
Step 2. Obtain OData endpoint URL. Retrieve the OData endpoint URL for your SugarCRM instance. This URL serves as the entry point for accessing SugarCRM data via the OData protocol.
Step 3. Connect Looker Studio to SugarCRM. Within Looker Studio, set up a connection to SugarCRM using the OData connector. Provide the OData endpoint URL, along with any required authentication credentials, to establish a secure connection.
Step 4. Create dashboards and reports. Utilize Looker Studio's intuitive interface to design interactive dashboards and reports that leverage your SugarCRM data. Leverage Looker's powerful visualization tools and features to uncover valuable insights and trends.
3. Transfer SugarCRM data to Looker Studio via direct connector
There’s also a direct connection that allows data transfer from the Looker itself. Skyvia Connect acts as a bridge between your on-premises SugarCRM data and Looker Studio, ensuring smooth and reliable data transfer.
The short checklist on how to integrate SugarCRM with direct connector:
Step 1. Configure сonnection. Specify SugarCRM connection details such as URLs, ports, and authentication credentials within Skyvia.
Step 2. Connect Looker Studio to Skyvia. Within Looker Studio, establish a connection to Skyvia using the Skyvia connector for data sources. Provide the necessary connection details, including the Skyvia endpoint and authentication credentials.
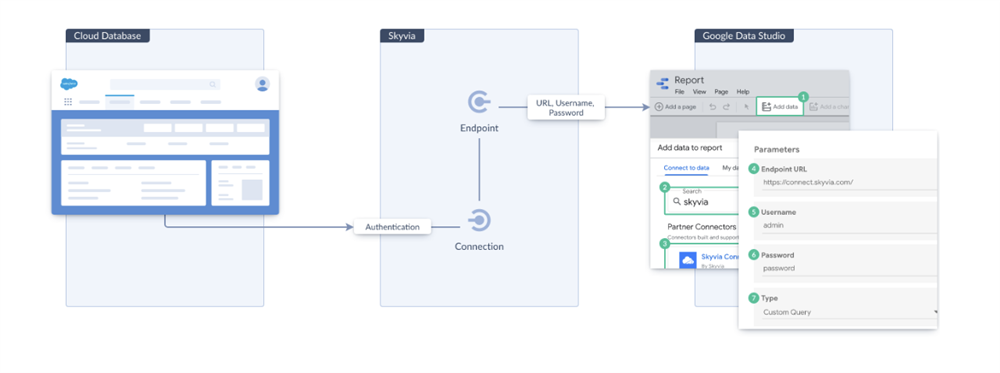
Step 3. Visualize and analyze data. With the connection established, users can access the SugarCRM data within Looker Studio by utilizing Skyvia Connect SQL endpoints as an intermediate layer.
Elevate your data analysis with seamless SugarCRM and Looker Studio integration
The mixture of advanced analytics, visualization, and reporting capabilities can help businesses optimize sales and marketing strategies, enhance their understanding of customer behavior, and drive overall growth and success. The Skyvia service simplifies the integration process, enabling users to easily access, transform, and analyze SugarCRM data within Looker Studio. By leveraging this powerful combination, businesses can take their data analysis to new heights.