

Even though nearly all modern API authentication specifications can be categorized into a few different types, every single one of them has nuances. Even authentication standards, like OAuth 2.0, have different grant types and have components of each that are implementation dependent. Thus, nearly every OAuth 2.0 implementation that I've seen requires custom code or a nuanced workaround to implement. Worse, in some cases, you have to invite auth's evil cousin “session timeout” to the party, and that can escalate quickly into trouble.
As a developer who is realizing an integration to a given service, you will need to research and understand these nuances in order to compensate in your code - and make accurate estimates.
Let's step back a bit and review the major categories of authentication.
When it comes to authenticating, most mainstream cloud services (e.g. Box, Hubspot, Quickbooks, etc) use one of: Basic, API Keys, Token, or OAuth - with all the other outliers falling into a catch-all category type of Custom (e.g. AWS Signature).
- Basic Auth: Username and password is passed in the authorization header. The user's information, : is encoded to a base64 string and transmitted in the request. Thus, to auth as
david:p@55w0rdthe client would send:Authorization: Basic ZGF2aWQ6cEA1NXcwcmQ=. To ensure security, HTTPS/SSL is required across the entire authentication data cycle as base64 is easily decoded.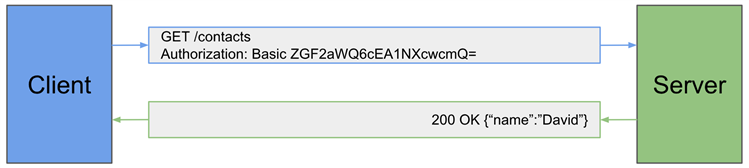
- API Keys: An API Key is passed in a request header, a cookie, or a query string (e.g.
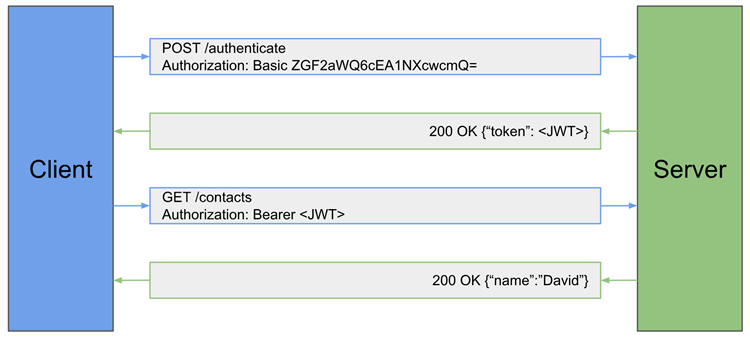
GET /contacts?api_key=abcd1234). API key based auth uses one or more keys that the client and server have agreed upon. Often they are automatically / randomly generated based on the client's specific information (e.g. IP address) or they can be provided from the endpoint service directly. They are only considered secure if used along with HTTPS/SSL encryption - Token/Bearer: Authentication is provided to the “bearer” using a cryptic token (string). The token is provided by the server and the client sends it in the authorization header, ie. Authorization: Bearer . This, once again, is only secure if used over HTTPS/SSL encryption.
- OAuth 2.0: Used by many modern cloud based services. It is primarily used to allow a client to gain access to protected server resources without having to share user credentials. There are several different grant types in the OAuth 2.0 framework and most of them are designed to prevent passwords from being passed from server to server. Think of it as the client application delegates the responsibilities of authentication to some other service instead of managing them on its own.
While there are multiple types of OAuth 2.0 authorization grants, not every OAuth 2.0 implementation will support all or even more than one of them. Sugar Enterprise, for example, utilizes the Resource Owner Password Credentials (ROPC) grant type. For ROPC grants, a username and password are used for a single request and are sent directly to the client. The client then sends those credentials to the authorization server to be exchanged with for an access token. This grant type can eliminate the need for the client to store the resource owner credentials for future use, by exchanging the credentials with a long-lived access token or refresh token.
For the more common Authorization Code grant type, the OAuth 2.0 flow is described below. Before the authentication process can start, OAuth requires that the client application register with the authorization service. It requires basic information such as name, website, and callback URL (HTTPS only) which is used to redirect the user once they have allowed access to their data. Once registered, the endpoint service provides a set of credentials: a client_id and a client_secret. The client secret must be kept confidential, otherwise security is compromised.
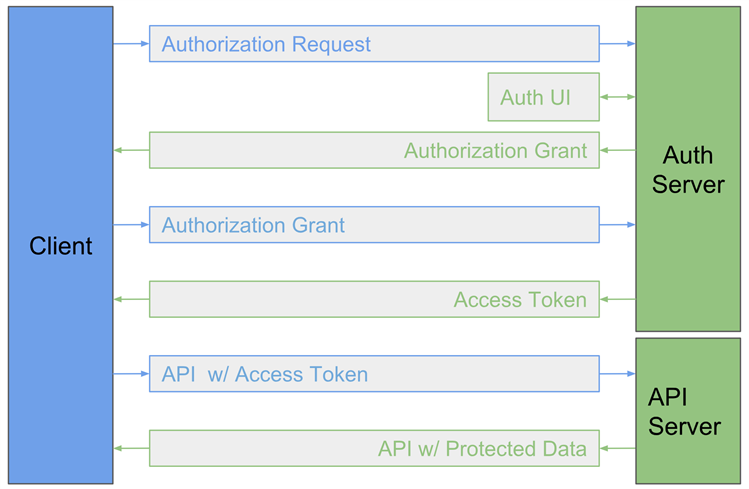
OAuth 2.0 flow consists of the following steps:- Client application makes a request to the authorization server at endpoint service, which will respond by displaying a login and authorization UI page to the user - requesting permission to share specific data assets stored within the endpoint service.
- Once approved by the user, an authorization grant is sent back to the requesting application which contains an authorization code.
- The requesting application then uses the authorization grant and authorization code to request an access token from the endpoints authorization server.
- The authorization server within the endpoint service then provides an access token that is specifically tailored for the requesting user - setting what level of access is granted (scope) that was authorized by the user in step 1.
- Next, the requesting application can use the access token to make requests to the endpoint service to retrieve data assets authorized by the user.
What are the OAuth 2.0 nuances that you have to compensate for in your application's code? How the authorization server shares the access token with the resource server is one. Also, refresh tokens and access token expiration times are implementation details that can vary across services.
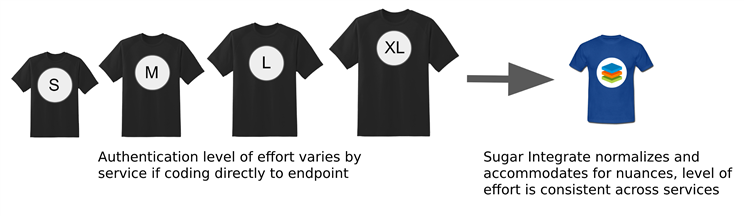
Now that we are all experts on the different categories of API authentication, you can sympathize the next time you are in a sprint planning meeting and your developer's estimates for adding the authentication portion of your integrations is larger in size than expected.
There is a better way! With Sugar Integrate we've built authentication into ALL of our 200+ Adapters. We've standardized to either one or two REST API calls, depending on the authentication type in play.
Our Adapters account for the nuances with authentication, regardless of the endpoint's authentication type and specs. For example, refresh tokens? Session timeouts? Handled automatically by the Adapter. We've done the hard work for you, leveling the authentication playing field. Making your estimates more consistent.
Our Adapters not only reduce the development effort required for your integrations, they go way beyond that. In fact, once authenticated, all that is needed to access your customer's endpoint data is a Sugar Integrate granted instance token - similar to the access token in the OAuth 2.0 flow. Example:
curl -X GET “https://api.cloud-elements.com/elements/api-v2/ping” -H “accept: application/json” -H “Authorization: User , Organization , Adapter ”
How do you get the Adapter Instance Token? It is the result from using the built in authentication API resources provided by the Adapter.
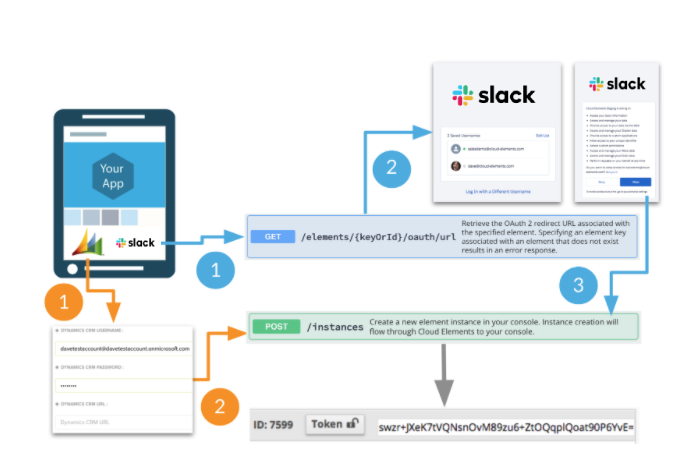
For endpoints that are authenticated via OAuth (e.g. SFDC how2 video), the path follows the blue flow scenario in the diagram below:
- First call is made to
GET /elements/{keyOrId}/oauth/url- which passes in the Client ID, Client Secret, and Callback URL (obtained from the registered app - see above). - User authenticates via the UI provided by the endpoint's authorization server. Once authenticated, the authorization code is returned.
- Second call is made to POST /instances to create a new credentialled Adapter instance - passing in the authorization code. If successful, a unique Adapter instance token is returned, which is used with all subsequent calls to get or post data to the user's endpoint service, in this case Slack.com. The level of access depends on the authorization scope as determined during the first step.
For all other (non-OAuth) endpoints, the path is the orange flow scenario in the diagram above:
- User enters their credentials based on the authentication type: key(s), username & password, or token(s).
- Call is made to POST /instances to create a new credentialled Adapter instance.
Want more goodness? More t-shirt size reducing things about the POST /instances API resource call:
- For OAuth endpoints, the Adapter will encrypt and store the access and refresh tokens, and use the refresh token when needed to automatically refresh the access token set. Thus, your developers don't have to build the framework to do this - including managing session timers!
- Given that the JSON body payload for the POST /instances will vary by endpoint - Sugar Integrate has already figured those nuances out, tested them, added the necessary code to the Adapter to compensate for the endpoint's inevitable authentication nuances, and mapped out a JSON payload sample - just cut and paste from the example provided.
- Once the unique instance token is retrieved, you only need to store it in your application - usually in a table where you keep your customer's information - just store the instance token and the name of the endpoint (e.g. sfdc). When you include it in subsequent API calls, our platform will use it to determine what endpoint service it is associated with and whose credentials to use.
Not a believer yet?
No problem, it can take an example to see just what I mean when I say, “We do the hard work for you”. So, here is an example of taking a size L authorization implementation and reducing it to a size S using Sugar Integrate:
Authentication Flow
Scenario 1: Via Native Dropbox API
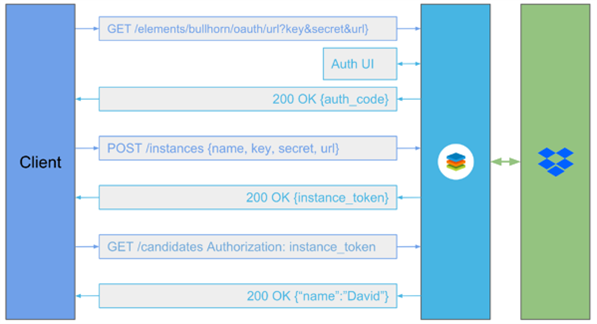
- Go to authorization page with registered OAuth information to login in the client's user, i.e.
https://www.dropbox.com/oauth2/authorize?client_id=MY_CLIENT_ID&redirect_uri=MY_REDIRECT_URI&response_type=code - Log into the application via the Auth UI and prompt permission to share specific data assets stored within the endpoint service. Once approved by the user, an authorization grant is sent back to the requesting application which contains an authorization code.
- The requesting application then uses the authorization grant and authorization code to request an access token from the endpoints authorization server, i.e.
POST https://www.dropbox.com/oauth2/token?grant_type=authorization_code&code={auth_code}&client_id={client_id}&client_secret={client_secret}The authorization server within the endpoint service then provides an access token and a refresh token that is specifically tailored for the requesting user - setting what level of access is granted (scope) that was authorized by the user in step 2.
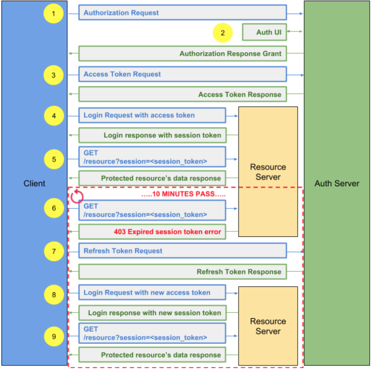
Note: The access token in the response is only valid for a limited time. Then you will need to make an additional call with the refresh token to retrieve another pair of tokens. - With the access token, you need to make a call to the login API to retrieve the session token
- With the session token, you can make requests to the endpoint service to retrieve data assets authorized by the user.
- Once 10 minutes elapses, we encounter an error in trying to make a request to the endpoint service to retrieve data asserts, 403 Expired session token error.
- With the refresh_token from step 4, we will make a refresh call to get a new pair of access and refresh tokens to use for the next 10 minutes, i.e
POST https://auth.bullhornstaffing.com/oauth/token?grant_type=refresh_token&refresh_token={refresh_token}&client_id={client_id}&client_secret={client_secret} - With the new access token, you need to make a call to the login API to retrieve the session token. (example in 4)
- With the new session token, you can make requests to the endpoint service to retrieve data assets authorized by the user.
NOTE: Repeat steps 6-9 every 10 minutes
Scenario 2: Via Sugar Integrate API
- Create an Instance: to provision a Dropbox Adapter instance, locate the Dropbox Adapter in the Sugar Integrate catalog. Give the instance a name and hit "Create Instance" button.
- You will be redirected to the Dropbox API Request Authorization page where you can enter your Dropbox credentials. Depending on your account settings, you may be presented with a 2-factor authentication screen. Dropbox will send you a code. Enter this code when prompted by the Authentication page.
- Dropbox will next ask you to approve of the permissions that Sugar Integrate is requesting.
- After clicking "Allow" for the Dropbox permissions, you will be redirected back to Sugar Integrate where you should see that you now have an authenticated instance of the Dropbox adapter.
That's it! You have successfully authenticated to Dropbox's APIs and can now start making requests.
-

Jeff Bickart
-
Cancel
-
Vote Up
0
Vote Down
-
-
Sign in to reply
-
More Actions
-
Cancel
-

Michael Shaheen
in reply to Jeff Bickart
-
Cancel
-
Vote Up
0
Vote Down
-
-
Sign in to reply
-
More Actions
-
Cancel
Comment-

Michael Shaheen
in reply to Jeff Bickart
-
Cancel
-
Vote Up
0
Vote Down
-
-
Sign in to reply
-
More Actions
-
Cancel
Children