Dashlet for Compose Email view

Dear SugarClub users. 

I'm using SugarCRM Version 11.0.3 (Build 292 P) (Q2 2021) on Prem.

I have created some simple Dashlets that hold static HTML text. These appear when a Quote is being created or edited. 

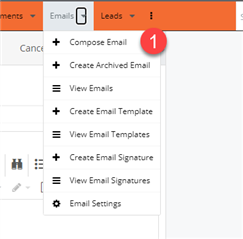
I have been able to add a similar dashlet to the Email List and Email Record view, but I would like to add a similar Dashlet to the Compose Email view. i.e. when you select Email | Compose (As in #1 Below)
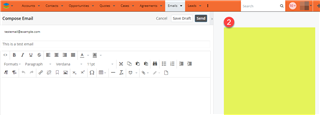
I would like to add it the Dashlet area of the Email Compose view. (as in #2 below)
For the Email record and list view I have added the relevant Dashlet files to the "./custom/clients/base/views/email-dashlet" directory. i.e.:

  • email-dashlet.hbs
  • email-dashlet.js
  • email-dashlet.php

With the following setting in the email-dashlet.php file. 

<?php

$viewdefs['base']['view']['email-dashlet'] = array(
    'dashlets' => array(
 array(
    'label' => 'Email Dashlet',
    'description' => 'Description',
    'config' => array(
                ),
    'preview' => array(
                ),
    'filter' => array(
                'module' => array(
                    'Emails'
                ),
            ),
        ),
    ),
);

This allows me to add the Dashlet to the Email Record and List view. 

Is there a different way to add this to the Compose view of an email? Thanks for your assistance.

Parents
  • Hi Peter I would like to do exactly the same thing as you. Did you find any way to do this?

  • Hi Raquel, 

    Yes I found a way to do this. From my notes you need a few things. You will need to add a few files as below: 

    create-preview.php

    • This is the view to be pulled in for the Email Compose View
    • Create Layouts directory under base
    • Create create-preview directory
    • e.g. \custom\modules\Emails\clients\base\layouts\create-preview\create-preview.php

    compose-email.php

    • The layout that has the array to show the layout create-preview for the Compose Email view.
    • Create compose-email directory
    • e.g. \custom\modules\Emails\clients\base\layouts\compose-email\compose-email.php

    email-text-templates.hbs

    • Contains HTML for Snippets
    • Create views\email-text-templates
    • e.g. \custom\modules\Emails\clients\base\views\email-text-templates\email-text-templates.hbs

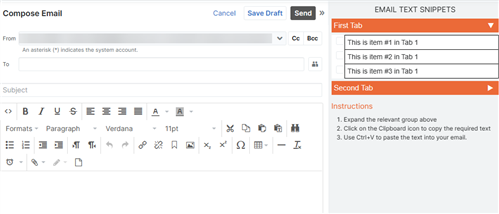
    If you have a look at the .hbs file, it contains a few elements and custom CSS. I'm using some collapsible elements (tabs) and other stylings. It will give you the end result as in the image below:

    I'm also using calling some Javascript from Sugar, this will allow you to click on the button and copy the text snippet to your clipboard. I found this at "sugarcrm/include/javascript/sugar7/clipboard.js"

    Remember to check the access permissions and ownership of the new files and folders you create. 

    You will also need a Repair

    Samples of the files are below;

    create-preview.php

    <?php
    /*
     * Your installation or use of this SugarCRM file is subject to the applicable
     * terms available at
     * http://support.sugarcrm.com/Resources/Master_Subscription_Agreements/.
     * If you do not agree to all of the applicable terms or do not have the
     * authority to bind the entity as an authorized representative, then do not
     * install or use this SugarCRM file.
     *
     * Copyright (C) SugarCRM Inc. All rights reserved.
     */
    $viewdefs['Emails']['base']['layout']['create-preview'] = array(
        'components' => array(
            array(
                'view' => 'email-text-templates',
            ),
        ),
    );
    

    compose-email.php

    <?php
    /*
     * Your installation or use of this SugarCRM file is subject to the applicable
     * terms available at
     * http://support.sugarcrm.com/Resources/Master_Subscription_Agreements/.
     * If you do not agree to all of the applicable terms or do not have the
     * authority to bind the entity as an authorized representative, then do not
     * install or use this SugarCRM file.
     *
     * Copyright (C) SugarCRM Inc. All rights reserved.
     */
    
    $viewdefs['Emails']['base']['layout']['compose-email'] = array(
        'components' => array(
            array(
                'layout' => array(
                    'type' => 'default',
                    'name' => 'sidebar',
                    'components' => array(
                        array(
                            'layout' => array(
                                'type' => 'base',
                                'name' => 'main-pane',
                                'css_class' => 'main-pane span8',
                                'components' => array(
                                    array(
                                        'view' => 'compose-email',
                                    ),
                                ),
                            ),
                        ),
                        array(
                            'layout' => array(
                                'type' => 'base',
                                'name' => 'preview-pane',
                                'components' => array(
                                    array(
                                        'layout' => 'create-preview',
                                    ),
                                ),
                            ),
                        ),
                    ),
    
                ),
            ),
        ),
    );


    email-text-templates.hbs

    <style type="text/css">
      .custom-table {
        border-collapse: collapse;
        border-spacing: 0px;
      }
    
      .custom-table td {
        border-color: black;
        border-style: solid;
        border-width: 1px;
        font-family: Arial, sans-serif;
        font-size: 14px;
        overflow: hidden;
        word-break: normal;
      }
    
      .custom-table th {
        border-color: black;
        border-style: solid;
        border-width: 1px;
        font-family: Arial, sans-serif;
        font-size: 14px;
        font-weight: normal;
        overflow: hidden;
        padding: 10px 16px;
        word-break: normal;
      }
    
      .custom-table .custom-table-left {
        border-width: 0px;
        text-align: left;
        vertical-align: top;
        width: 8%;
      }
    
      .custom-table .custom-table-subheading {
        border-width: 0px;
        text-align: left;
        color: #f36c32;
        padding-bottom: 5px;
        padding-top: 5px;
      }
    
      .custom-table .custom-table-right {
        padding: 5px 5px;
        text-align: left;
        vertical-align: top;
        width: 100%;
      }
    
      tr.noBorder td {
      border: 0;
    }
    
      /* (A) TABS CONTAINER */
    .tab, .tab * {
      font-family: arial, sans-serif;
      box-sizing: border-box;
    }
    .tab { max-width: 700px;
          margin-left: 5px;
          margin-right: 5px;
    }
    
    /* (B) HIDE CHECKBOX */
    .tab input { display: none; }
    
    /* (C) TAB LABEL */
    .tab label {
      /* (C1) DIMENSIONS */
      position: relative; /* required for (f2) position:absolute */
      display: block;
      width: 100%;
      margin-top: 5px;
      padding: 5px;
    
      /* (C2) COSMETICS */
      /* font-weight: 500; */
      font-size: 15px;
      color: #fff;
      background: #F36C32;
      cursor: pointer;
    }
    
    /* (D) TAB CONTENT - HIDDEN BY DEFAULT */
    /* css animation will not work with auto height */
    /* this is why we use max-height instead */
    .tab .content {
      overflow: hidden;
      transition: max-height 0.3s;
      max-height: 0;
    }
    .tab .content p { padding: 5px; }
    
    /* (E) OPEN TAB ON CHECKED */
    .tab input:checked ~ .content { max-height: 100vh; }
    
    /* (F) EXTRA - ADD ARROW INDICATOR */
    .tab label::after {
      /* (F1) RIGHT ARROW */
      display: block;
      content: "\25b6";
    
      /* (F2) PLACE AT RIGHT SIDE */
      position: absolute;
      right: 10px; top: 5px;
    
      /* (F3) ANIMATED ARROW */
      transition: all 0.4s;
    }
    
    /* (F4) ROTATE ARROW ON CHECKED */
    .tab input:checked ~ label::after { transform: rotate(90deg); }
    
    </style>
    <h4 style="text-align: center;">EMAIL TEXT SNIPPETS</h4>
    
    
    <!-- FIRST TAB -->
    <div class="tab">
      <input id="tab-1" type="checkbox">
      <label for="tab-1">First Tab</label>
      <div class="content">
      <table class="custom-table">
        <tbody>
          <tr>
            <td class="custom-table-left">
    
              <button class="btn" type="button" data-clipboard="enabled"  data-clipboard-target="[name=item1]">
                <img class="clippy" src="/custom/images/clippy.svg" width="13" alt="Copy to clipboard" title="Copy to clipboard">
                </button>
            </td>
            <td class="custom-table-right">
              <span name="item1" class="copy">This is item #1 in Tab 1</span>
            </td>
          </tr>
          <tr>
            <td class="custom-table-left">
              <button class="btn" type="button" data-clipboard="enabled" data-clipboard-target="[name=item2]">
                <img class="clippy" src="/custom/images/clippy.svg" width="13" alt="Copy to clipboard" title="Copy to clipboard">
                </button>
            </td>
            <td class="custom-table-right">
              <span name="item2" class="copy">This is item #2 in Tab 1</span>
            </td>
          </tr>
          <tr>
            <td class="custom-table-left">
              <button class="btn" type="button" data-clipboard="enabled" data-clipboard-target="[name=item3]">
                <img class="clippy" src="/custom/images/clippy.svg" width="13" alt="Copy to clipboard" title="Copy to clipboard">
                </button>
            </td>
            <td class="custom-table-right">
              <span name="item3" class="copy">This is item #3 in Tab 1</span>
            </td>
          </tr>
         </tbody>
      </table>
      </div>
    </div>
    
    <!-- Second TAB -->
    <div class="tab">
      <input id="tab-2" type="checkbox">
      <label for="tab-2">Second Tab</label>
      <div class="content">
        <table class="custom-table">
          <tbody>
          <tr>
            <td class="custom-table-left">
              <!-- <button data-clipboard="enabled" data-clipboard-target="[name=item1]">Copy</button> -->
              <button class="btn" type="button" data-clipboard="enabled"  data-clipboard-target="[name=item4]">
                <img class="clippy" src="/custom/images/clippy.svg" width="13" alt="Copy to clipboard"  title="Copy to clipboard">
                </button>
            </td>
            <td class="custom-table-right">
              <span name="item4" class="copy">This is item #1 in Tab 2</span>
            </td>
          </tr>
          <tr>
            <td class="custom-table-left">
              <!-- <button data-clipboard="enabled" data-clipboard-target="[name=item1]">Copy</button> -->
              <button class="btn" type="button" data-clipboard="enabled"  data-clipboard-target="[name=item4]">
                <img class="clippy" src="/custom/images/clippy.svg" width="13" alt="Copy to clipboard"  title="Copy to clipboard">
                </button>
            </td>
            <td class="custom-table-right">
              <span name="item5" class="copy">This is item #2 in Tab 2</span>
            </td>
          </tr>
          </tbody>
        </table>
      </div>
    </div>
    
    <div style ="margin-left: 5px;margin-right: 5px;">
      <h4 style="color: #f36c32;">Instructions</h4>
      <ol>
        <li>Expand the relevant group above</li>
        <li>Click on the Clipboard icon to copy the required text</li>
        <li>Use Ctrl+V to paste the text into your email.</li>
      </ol>
    
    </div>
    

    I hope this information helps. Please let me know if you have any problems. 

  • Hi Peter,

    Thank you so much for taking the time to help me. It's working. Have a nice day. Thanks a lot.
Reply Children
No Data